Tundra blog

Tundra blog

Feel the cooling sensation of knowing things...


It is a programming blog btw

Hot

12 Kasım 2017 Pazar

BREAD is the new CRUD

Kasım 12, 2017 0
CRUD is a pretty classic term, an acronym for Create-Read-Update-Delete operations. These operations were considered as the essentials of persistence for any web  application, service, API and so on.

Well, since  then many things have changed... Machines are getting ready to take over, Facebook is sucking our lives, smartphones, single-page applications, capitalism, fall of the Soviet Union etc. etc. That means now we need to know more than just CRUD.

Well, this does not mean that CRUD is wrong. It is OK. However, CRUD does not completely cover nowadays applications (for example CMS applications) with huge amount of data, traffic, user interaction and so on.


When I was checking random stuff about this, I came up with strange names like DAVE (Delete-Add-View-Edit) or CRAP (Create-Retrieve-Alter-Purge) then BREAD. It is an acronym for Browse-Read-Edit-Add-Delete which mostly covers basic operations we do on our websites. (Simply put: listing, adding, updating, deleting and showing) 

There were some other propositions like "BROWSE", "MADS" and more... Well, acronyms are not so important. They just come and go. I think the main point is that we need to know our application's requirements and have an understanding about the proper guidelines for such persistence operations. 

thank you for your time. Cheers!


Read More

11 Kasım 2017 Cumartesi

Best Alternatives to PUTTY in 2017 (For Windows)

Kasım 11, 2017 0
Putty has been a corner stone of many developers for quite a long time. But today there are new necessities, things are not that simple like 5 years ago. Soo our ssh clients must also get smarter in a way.

That means, it is time to put aside PUTTY, look for new affairs.

1. MobaXterm 

There is free and business options for MobaXterm. You can also have either the portable version or install on your computer. However installation and unpacking takes more time than I expected.

Usage is very different than PUTTY. But it is based on PUTTY. That means, it is just a modern interface for an old program.

MobaXterm is basically a tabbed station for all of your connections. This means keeping all your terminals or SSH clients under one application, much more organized eh?

Here you can download

2. mRemoteNG

Strongest part about mRemoteNG is, the open sourceness. You can contribute, tweak, support. Another strong point is the language support. I've seen that they support quite a few language right now. Also it looks like they will add new languages in time.

About the look,  it looks more modern than the MobaXterm does. It also provides RDP feature for you remote servers. The sections which the connections are listed is similar. But the way you configure the connections is slightly different. It has this 'eclipse' feeling. I must say, I found it less practical to use than MobaXterm.

But anyway, here you can download

3. KiTTY

PuTTY and KiTTY...They are pretty much the same thing actually. If you are uncomfortable with the oldschool look of PuTTY, then you will like the KiTTY.

Technically speaking, KiTTY is a separate branch from PuTTy and it employs additional features such as session filters, pre-defined commands, automatic logon script etc. Also, KiTTY is more frequently updated than PuTTY (I see it as a good thing)


So, something additional for free? that is nice...

Here you can download KiTTY


Actually, I would like to find more of SSH clients... But it is very rare to find something more useful than PuTTY. I think when you check any of the options above and give it a try, you will want to replace your good old PuTTY with it.

Thank you for reading. Cheers!
Read More

5 Kasım 2017 Pazar

A comparison: Data Mapper vs. Active Record

Kasım 05, 2017 0

Hello,
In this article I want to compare Data Mapper and Active Record patterns. For this,  I will take into account few points:
  • Learning curve
  • Performance
  • Features & Usability
So let's go into the details. I hope you will enjoy the content. I usually add a new post every 4-5 days. So, quite possible that you will find something interesting for yourself. 

Data Mapper
Basically, a Data Mapper is a Data Access Layer that performs two-ways transfer operations between a relational database and a domain layer in a system. The goal of the Data Mapper pattern is to separate memory representation and data storage from each other.

Data Mappers provide an abstraction layer that makes our system platform independent. But of course, it brings drawbacks with it. For instance, it is very hard to believe that an ORM will take into account all the optimization issues related to your database.

Active Record
In Active Record pattern, a database or a view is wrapped into a class. That means that every object represents a row in our database. That means Active Record ORMs are not really paying attention to the relations between tables in the database. For them every column is considered as a primitive value. That's why Active Record objects usually supported by models (In order to include relations between objects; you can think about it as constraints.).

For the comparison of learning curve I will be using Doctrine 2 (Data Mapper) and Eloquent (Active Record). Let's give some short information about each of them.


Doctrine 2
Doctrine 2 is an ORM (Object-Relational Mapper) for PHP. Basically it sits on top of a database abstraction layer (DBAL). One of its unique features is the Doctrine Query Language (DQL) to write queries in a object oriented SQL dialect.

Doctrine 2's initial commit was made in 2006. As the project became more mature, the adoption began to pick up. The community has become active and development has received regular contributions from various environments such as Google Summer of Code project.
Doctrine 1.0.0 was released on September 1, 2008.

The first stable version of Doctrine 2.0 was released on December 22, 2010, after 2.5 years of dedicated development starting in early 2008. 2.5 years of development may seem too long but Doctrine 2 has come back with strong features, performance improvements and more which made it a corner stone of ORMs.

A trivial information: 1. version of Doctrine was actually employing Active Recording pattern. Then in the 2. version, it is replaced with the Data Mapper pattern.

Eloquent
As written in Laravel documentation, The Eloquent ORM is a beautiful, simple ActiveRecord implementation. We believe that. In Eloquent, each database table has a corresponding "Model" which is used to interact with that table. Models allow you to query for data in your tables, as well as insert new records into the table. That is the essence of ActiveRecord ORMs.

Eloquent  is an advanced PHP implementation of the active record pattern, providing internal methods for enforcing constraints on the relationships between database objects. Eloquent ORM presents database tables as classes, with their object instances tied to single table rows.

Learning Curve
Since the learning curve is a process which is very personal, it is hard to say something definite about it. However, we can generalize it. Basically when you started using Doctrine 2, certain things would be new for you. In my opinion these things would consume more of your time to master it:

  • The procedure of using entity manager in every queries
  • Learning DQL in order to use in queries
  • Getting accustomed to the doctrine objects, procedures such as persist, flush and others

When it comes to Eloquent, it is basically crafted for Laravel Framework. But it is possible to use it outside of Laravel too. In my opinion, there will be less things to worry about Eloquent for the beginning since Active Record ORMs let you use objects directly as arrays. However, in Eloquent few things can be time consuming for the beginning:
  • Eager loading 
  • Learning to create proper models
  • Object relations can be confusing, such as manyToMany, hasOne, hasMany, belongsTo and others
Both Doctrine 2 and Eloquent have subjects which can be time consuming. On the other hand, same query can take 2-3 less lines of code on Eloquent since there is no entity manager employed. In my humble opinion, Mastering Doctrine 2 takes additional time, also switching from Eloquent to Doctrine 2 can be more difficult for developers, since it brings completely new concepts into the game.

Performance

It is expected that ORMs have poor performance when they are compared with Raw SQL. Since they are there to eliminate the platform dependency. But when we compare different types of ORMs, we can find an optimum type for our system. Data Mappers basically employ entity managers in order to write into the database. This is in contract with the Active Record since every object represents a row.

Few things about Data Mappers:
  • Takes more time to set-up, develop
  • It is obvious that the Data mapper queries may lack optimization at certain points. That means you will have to do nothing but to write queries by hand to improve performance.

There are few points which I must make about Active Record ORMs:
  • The objects are highly coupled with DB
  • It mixes the persistence logic with the business logic, which is contrary with the SOLID principles
  • It may have performance issues as the DB grows
Features & Usability
When it comes to the number of features, Data Mappers will provide additional features such as Entity Manager, ability to use composite keys, or even DQL (But that is specific feature only for Doctrine). On the contrary, Active record ORMs. will many times contradict with SOLID principles since it does not separate business logic with persistence. As the project grows, it may create weak points in your system.

However, the biggest advantage of the Active Record ORMs is their simplicity. It is not actually  feature but can be mentioned as a pseudo-feature.

Conclusion
Like many other comparisons, it is hard to define a winner. Active Record will give you enough features to accomplish CRUD actions with less effort to set-up and develop. However, when the project gets more complicated (As usual with the projects which employs agile methodology) Data Mapper will give you boundaries to manage your project.

Even the guys who works in development of Doctrine 2 preferred Data Mapper pattern over Active Record. This is sort of a self-explanatory information. Data Mappers will provide you rich features, once you get accustomed to the usage, then you can use it anywhere and anytime.

So in my opinion Data Mappers beat Active Recorders when it comes to a serious project.

References
https://pressupinc.com/blog/2014/11/orm-patterns-active-record-data-mapper/
https://www.thecodingmachine.com/orm-active-record-and-data-mapper/
https://www.tomasvotruba.cz/blog/2017/03/27/why-is-doctrine-dying/


Read More

1 Kasım 2017 Çarşamba

Tesseract OCR in Zend Framework

Kasım 01, 2017 0
Hi,
this is going to be a short guide about how to start with Tesseract-OCR for php. Tesseract is an open-source OCR engine which is quite competetive. I've tried it for a project and I was surprised by the performance. Then I wanted to let more people know about it.


Anyway, here you can see the repository for Tesseract. I will be going through it with a Zend Framework 2 project that I've been building for some time.

My current setup is PHPStorm + vagrant for my ZF2 projects (currently I use 2017 version of PHPStorm and I use ScotchBox configurator for vagrant)
Alright, let’s cut it short and start doing something.

0- Let's run PHPStorm and run Tools > vagrant > up.

1- Installation for Tesseract is fairly simple. Since it runs on the server side, we will need to install Tesseract-OCR in our vagrant  (Which is basically a Linux VM) Afterwards you have two choices: either you can add the Tesseract PHP library on your project. Or simply execute shell commands with a proper Tesseract commands on your server.

Installation is all about executing few commands in our vagrant machine. To connect our vagrant machine: Tools >  Start SSH Session, and then choose your virtual machine.
After you've opened the terminal for your vagrant machine, you have to execute few commands.

For the Tesseract itself:

sudo apt-get install tesseract-ocr

It will probably ask for confirmation about the installation. Please say yes. However, it is not finished yet. Default Tesseract is coming only with English language. If you want to use any other language than English, the corresponding language pack must be installed additionally.

For any other language family, Tesseract language pack must be also installed. Let’s install Polish language support.

sudo apt-get install tesseract-ocr-[pol]

The parameter is nothing but a country code in ISO 639-2 type. For  a different language, you may look for the language code here.
Installation will again ask for confirmation. Accept and it will continue. After it finishes, you are ready to shoot.

2.a- Usage in command line:
Command line usage of Tesseract is quite simple. Here you can see all possible commands.
A sample piece from a picture of an invoice:
picpiece

A sample command that I've used is:

tesseract data/Faktura.jpg stdout -l pol -c 'output=hocr' hocr

This command reads the 'Faktura.jpg' file, then creates the hocr segments of it. The output image looks like this on the browser:

picpiece3

Hocr is the version of ocr output with html tags and location attributes. It is quite useful when developers try to write templates. Here you can see a snippet of the output for the Faktura.jpg
Faktura VAT  ORYGINAŁ  2017-07-20 Poznań 2017-07-20 

Pieczeć 'irmy data I miejsce wyslawiema dokumentu data sprzedaży 

As you can see, it is a plain HTML which is quite useful. Simply it can be converted to DOMElement object and get attributes and more.

2.b- Usage with PHP Library
We have to include Tesseract PHP Library to our project. You can go to the Tesseract repo and simply add it by using composer. Here is the line you must add to your composer.json file:

"thiagoalessio/tesseract_ocr": "1.0.0-RC"

So far Tesseract library supports sufficient parameters, but not all of them. In the example below Tesseract scans the image with the Polish language support.

$tess = new \TesseractOCR($imagePath);
$tess->lang('pol')->run();

But here is a small thing that you can do for additional parameters. Create a new class which extends the Tesseract library and overload the 'run' method in order to produce 'hocr' output which was not implemented in the library. Like this:

class TesseractCustom extends \TesseractOCR
{
    /**
     * In original php library, we cannot get output with hocr,
     * so we modify it here a little bit
     *
     * @return string
     */
    public function run()
    {
        $req = $this->buildCommand() . ' hocr';
        return trim(`{$req}`);
    }
}

This quick overloading will give us possibility to add whatever parameter we will need. I guess that is it for now. I hope it will be useful for someone :) Good luck developing!
Read More

20 Mart 2014 Perşembe

Making a currency converter on Android; Part 1 - YQL and Activity

Mart 20, 2014 0
Hi :)  This tutorial series will cover all the things to make a project. So I will show you guys how to make a simple project by making a small currency converter. And this is the first part of the tutorial. This article consists information about:

  • YQL console which is pretty cool.
  •  A few things about android activities.

Lets begin!
YQL

If we want to mention about YQL console, it's a huge structure, a remote database which is managed by Yahoo. We use A modified version of SQL which is called YQL. And we Query the Yahoo's databases and many other websites.There are tons of open databases. And it's pretty useful.

Okay, we dont really need to sign up in order to use those databases. They're mostly open. Basically, we make a request from yql database. and the response will consist the data we need. All those request and responses can be in XML of JSON language. And we will parse before showing.

Go to http://developer.yahoo.com/yql/console -> And click on "Show Community tables"
For exchange, we can use yahoo.finance.xchance database. Whenever we click on the name of database, a test statement and test data will take place. You must see something like this:


We can parse XML or JSON. I've decided to use JSON because it gives us more practical response. Click on the JSON button and disable the "diagnostics". You will see a link at the bottom something starts like http://query.yahooapis.com/v1.. Copy the link.

Look at the link, do you see that if we replace the "EURUSD" with something else, we will get another response. So we will to split this link into 3 parts.


  1. private String requestWord1 =http://query.yahooapis.com/v1/public/yql</code><code>=select%20*%20from%20yahoo.finance.xchange%20where%20pair%20in%20(%22";
  2. private String requestword2 = "EURUSD";
  3. private String requestWord3=%22)&amp;format=json&amp;env=store%3A%2F%2Fdatatables.org%2Falltableswithkeys&amp;callback=";


Now we only need to change the "requestword2" before making a request. Then combine these 3 strings and make a request by a HTTPRequest class.

Manifest file of the project:

Permissions:Firstly, we need to set our manifest file. I guess we only need Internet. So our permission statement is:

&lt; uses-permission android:name ="android.permission.INTERNET" /&gt;

And you had better if you change the minimum required sdk from 8 to 11. Android manifest file is done for now. Let's move to the activity design :)

And our manifest file is:

<?xml version="1.0" encoding="utf-8"?>
<manifest xmlns:android="http://schemas.android.com/apk/res/android"
package="com.apps.currency"
android:versionCode="1"
android:versionName="1.0" >
<uses-permission android:name="android.permission.INTERNET"/>
<uses-sdk
android:minSdkVersion="11" />
<application
android:allowBackup="true"
android:icon="@drawable/ic_launcher"
android:label="@string/app_name"
android:theme="@style/AppTheme" >
<activity
android:name="com.apps.currency.MainActivity"
android:label="@string/app_name" >
<intent-filter>
<action android:name="android.intent.action.MAIN" />
<category android:name="android.intent.category.LAUNCHER" />
</intent-filter>
</activity>
</application>
</manifest>
Activity:
There are thousands of different ways to order elements in your activity. You can set the dimensions as


  • "wrap_content",
  • "match_parent",
  • "Fill_parent"


I've decided to set the width or height as "wrap_content" It's a better approach if we use "dp" or "pix" while setting width or height.

activity_main.xml
android:id="@+id/entrybox"
android:layout_width="wrap_content"
android:layout_height="60dp"
android:layout_alignParentLeft="true"
android:layout_alignParentTop="true"
android:ems="10"
android:gravity="center"
android:inputType="number"
/>
<EditText
android:id="@+id/resultbox"
android:layout_width="wrap_content"
android:layout_height="60dp"
android:layout_below="@id/entrybox"
android:layout_toLeftOf="@+id/spinnerentry"
android:ems="10"
android:gravity="center"
android:inputType="number"
/>
android:id="@+id/progressBar"
style="?android:attr/progressBarStyleLarge"
android:layout_width="wrap_content"
android:layout_height="wrap_content"
android:layout_below="@+id/currencyCode"
android:layout_centerHorizontal="true"
android:layout_marginTop="80dp"
android:visibility="invisible" />
The graphical output of this xml:


Right now our dropdowns(spinners) are all empty. And there's nothing inside of our editText elements. So far we've only set the appearance. We will handle the rest of them in the following tutorial.

Simple? It seems easier :)
On the next tutorials, we will modify the java methods to add more and more capabilities. This is the end of this tutorial. Thanks for reading.

And here you can download the whole project.
currency.zip
Read More

23 Kasım 2013 Cumartesi

Xbee Zigbee dinamik programlama

Kasım 23, 2013 0
Tekrar merhabalar,
Xbee modüllerini Explorer aracılığıyla programlamak işin gerekli bir kısmı. Ama her programlama esnasında, Xbee'yi devreden çıkarıp Explorer'a bağlamak gerekiyor.


Arduino kartları kullanarak Xbee ile ilgili işler yaparken, modülleri detaç etmeden de programlamasını yapabiliriz. Nasıl mı?
Nasıl?
şöyle:
Xbee modülleri, 'DIn' pinlerine gönderdiğimiz verileri direkt olarak network'e gönderiyor. Ama bu pinlere 'AT' komutlarını gönderirsek de modülü programlamaya başlarız. Bu kadarını bilmek yeterli.
Bu iş için 'arduino mega' kartını kullanmak daha iyi olur. Çünkü 3 adet Serial inout'u vardur.
Yapacağımız iş, Serial1'e göndereceğimiz komutların Serial2'ye bağlı olan Xbee modülüne ulaşmasını sağlamaktır. Böylece modülü devreden sökmeden programlama işini yapabiliriz.

void setup(){
Serial1.begin(9600);//serial1 ve serial2 yi kullanacağız
Serial2.begin(9600);
}

String command= ""; //göndermekte olduğumuz komut
String response= ""; //Xbee'den bize gelen cevap
char dummy; //read işlemi için bir tampon
void loop(){
command= "";//command stringini temizlemek
if(Serial1.available()){//Eğer bir komut göndermişsek
do{
dummy= Serial1.read();//komutu al, "command"stringine at
delay(20);
command+= dummy;
}while(Serial1.available());
pushCommand();//komutu Xbee modülüne gönderme fonksiyonu
}//end of if
delay(500);
}//end of function
void pushCommand(){
response= "";//response u temizleme
Serial2.print(command);//komutu xbee'e gönderir
for(int i= 0; i<10; i++){//xbee modülünden gelecek cevabı bekler
delay(200);//maksimum 2 saniye boyunca cevap bekler;
if(Serial2.available()){//cevap gelirse
do{
dummy= Serial2.read();//cevap stringini okumaca
response+= dummy;
}while(Serial2.available());//tüm response'u almaca
if(response.equalsIgnoreCase("OK"))Serial1.print("OK");//bize OK mesajı gönderir
}//end of if
}//end of for
}//end of function
Evet. Programı düzenleyebilirsiniz, düzeltebilirsiniz. Açık kaynak kodu olmaktadır. Umarım işinize yarar.

Read More

Xbee ve Zigbee'ye giriş

Kasım 23, 2013 0
Merhaba, bu yazıda Xbee hakkında birşeyler bulacaksınız. Hafif ve eğlenceli bir konu olması için gerekeni yapacağım.
Yazı 3 kısımdan oluşuyor:
1-Xbee hakkında bilgiler
2-"at" komutları (Xbee programlama için)
3-örnek program
Soru ve görüşleriniz varsa, lütfen yorum bırakın :)
1-XBEE hakkında bilgiler
Xbee'yi bilen bilir, kişisel-kurumsal herhangi bir kablosuz ağ kurabilirsiniz. Oldukça da ekonomiktir. Tabi bunlar işin teferruatı. Xbee modüllerini kullandıkça, onun gerçek yeteneklerini açığa çıkaracaksınız. Ve eğer ilgiliyseniz, gerçekten sıkılmayacağınız bir konu.


Xbee/Zigbee'nin tarihinden bahsetmek istemiyorum. Onun yerine Xbee  modüllerini kullanmak hakkında birşeylerden söz edeceğim.
Her Xbee modülü programlanmaktadır. Bu ister bir grafik arayüz, ister bir terminalle olabilir. Neyi programlıyoruz? Başlıca şunları:
1-Tabi ki Xbee modülüne bir isim veriyoruz,
2-Kablosuz ağımızı tanımlayıp numaralandırıyoruz. Bu, diğer XBEE ağları ile karışmaması için yapılmaktadır.
3-Her modülün veri aktaracağı diğer modülü tanımlıyoruz. Normalde, bir modül sadece başka bir modülle haberleşebilir. Tabi ki broadcasting (çoklu yayım)için özel bir parametre girmek gerekiyor.
Bir hatırlatma: Yeni tip XBEE modülleri (versiyon 2.0 ve üstü) kullanılarak bir Mesh ağı oluşturulabilir. Benim kullandığım tip modüller, birazcık ilkel :) version 1.1 Version 2 olmayan modüller için "digimesh" adlı bir yazılıl kullanılmaktadır. Digimesh ile ilgili bir yazı hazırlamaktayım. Sizle paylaşacağım yakın zamanda.
4-Modülün iletişim hızını belirleriz. (baudrate olarak)
Xbee modülünün başlıca programlanma başlıkları bunlardır. Her modül tek tek programlanır. Bu işlem, modülün veri giriş bacağına gönderdiğimiz bir dizi veriden ibarettir. Ve gerekli konfigürasyonları yapılır.

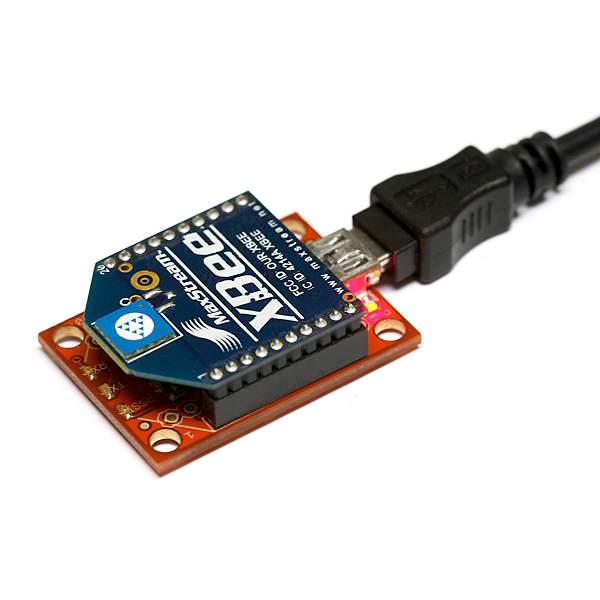
Bir Xbee Explorer

Bu işlemi yapmak için birkaç seçeneğimiz var tabi ki:
1-Öncelikle, Xbee modülünün bağlanacağı bir explorer, veya kendi kuracağınız bir devre gerekiyor. (Modülün besleme voltajları ve bazı pinler kritik derecede hassastır. Bu yüzden bir explorer devresi almanızda fayda var. Yoksa modül zarar görebilir.)
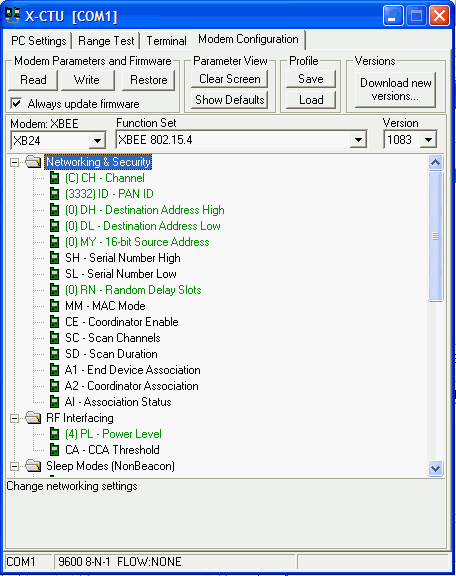
2-Programlamak için "X- CTU" programını kullanabilirsiniz. Bu program bir terminalin aksine, grafiksel bir arayüzle modülü kolayca programlamanızı sağlıyor.

X-CTU arayüzü

3-X-CTU'ya alternatif olarak herhangi bir hiperterminal programı kullanabilirsiniz. Bu programlar, sizin istediğiniz porttan, sizin istediğiniz protokolde iletişim sağlar. Örnek olarak "PuTTy" çok sık kullanılır. Putty programını kullanırken yapmanız gereken: gerekli konfigürasyonları girmek ve açılan terminalde, "at" komutlarını girmektir.

putty3

Her komuttan sonra, modülden "OK" cevabı almak farzdır. :)
 2-"AT" komultarı 
Bu komutlar, xbee modüller için oluşturulan resmi komutlardır. Terminalden direkt olarak konfigüre etmek için bu komutlar kullanılır. Temel 7 tane komut vardır.
+++: Modülü programlamaya hazırlamak için gönderilir.
ATMY: Modülün numaralandırılması için kullanılır.
ATDL: Modülün Haberleşeceği diğer modül için kullanılır. Buna göre bir modül yalnızca bir adrese veri gönderebilir.
(Tabi yeni çıkacak versiyonlarda bu konuda çalışmalar yapılmaktadır.)
ATID: Modüllerin kullanacağı PAN (Kişisel alan ağı) numarası. Ortamdaki tüm modüller aynı ağı kullanmalıdır.
ATBD: Baudrate ayarlamak için kullanılır. Her rate için farklı bir numara vardır.
0:1200 bps
1:2400 bps
2:4800 bps
3:9600 bps
4:19200 bps
5:38400 bps
6:57600 bps
7:115200 bps
ATWR: Gönderdiğiniz verileri( yaptığınız değişiklikleri) kalıcı hafızaya yazar.
ATCN: Konfigürasyonu sonlandırır.
Terminalden gönderdiğiniz her veri olumlu sonuçlanmayacaktır. Ama olumlu sonuçlanan her komuttan sonra, modül size "OK" mesajı gönderir.

Bir deneme programı yazalım. Şuan 2 modülümüz var.
modül 1:
+++
ATMY 1
ATDL 2
ATID 1000
ATBD 3
ATWR
ATCN
modül 2:
+++
ATMY2
ATDL1
ATID1000
ATBD3
ATWR
ATCN
Dikkat edilmesi gereken noktalar
her komuttan sonra ekranda "OK" yazısı görünmelidir.
Her komut dizisine "+++" yazarak başlanır.
HER modülün "ATID" değeri aynı olmalıdır. Yoksa aynı ağda konuşamazlar.
Her modülün baudrate'i aynı olmak zorundadır. Yani ATBD değerleri daima aynı olmalıdır.
Değiştirmeleri yaptıktan sonra Mutlaka "ATWR" ile Bu bilgiler belleğe yazılmalıdır.
Her oturum "ATCN" ile kapatılmalıdır.
Modül numarası: 0000- FFFE(hexadecimal) arası herhangi bir numara olabilir.
Bu durumları gözönünde bulunmanız gerekiyor. Bir ek bilgi de şu: Eski versiyon modüllerde iletişim point-to-point yapılıyor. Yani bunun anlamı, bir modül sadece tek modüle veri gönderebilir.
Birden fazla modüle veri gönderebilme işlemi için özel oluşturulmuş bir adres var. ATDL (destination address) yerine "FFFF" yazdığımızda, bu modül public bir kanalla diğer tüm modüllere verisini gönderir. Bunu "BroadCasting" olarak düşünebilirsiniz.
Hatta size bir büyük-ağ örneği de vereyim. Elimizde 3 modül var ve bunlardan biri merkez olsun. Merkezdeki modül diğer 2 modüle veri gönderiyor ve alıyor.

Modül M:
+++
ATMY 0
ATDL FFFF
ATID 20
ATBD 4
ATWR
ATCN

Modül 1:
+++
ATMY 1
ATDL 0
ATID 20
ATBD 4
ATWR
ATCN

Modül 2:
+++
ATMY 2
ATDL 0
ATID 20
ATBD 4
ATWR
ATCN

Gördüğünüz gibi burada ATMY (modül adresleri) değişti.
Ve yine farketmişsinizdir: Merkez modülün ATDL'si FFFF olarak,
Diğer modüllerin ATDL'leri de 0 olarak yazıldı.
Bunun anlamı: Merkez modül diğer 2 modüle veri gönderebilir. Diğer modüller de sadece merkez modüle veri gönderebilir.
Bu yazıyı güncel tutmaya çalışacağım. İlgilenirseniz blogda birkaç güzel yazı da bulabilirsiniz.


Read More